Blog #1: Light!
I quite often get a lot of comments regarding the light in my photos of Arthur and Sybbie, and it's a very astute observation! Light is a fundamental aspect of photography - in fact, a camera doesn't capture an "image" at all, it only captures light on a sensor! Very simply, if there's no light, there's no image! Beginner photographers need to learn about the properties of light in order to create well exposed images, but more experienced photographers actively and creatively find light with certain properties to make an image more beautiful. With this in mind, here's some beautiful natural lighting tips for any budding amateur or parent photographer out there. These can all be used with a phone camera, too, so don't worry too much if you haven't got a DSLR!
1. Understanding Exposure
A camera creates a photograph by letting light in through the lens and onto a sensor. On a very basic level, exposure in photography relates to how the light that is let in is balanced in an image. A correctly exposed image will have good detail in both the brighter parts of the image (known as "Highlights") and the darker parts of the image (known as "Shadows"). Finding this balance is what taking good images is all about! When we "overexpose" an image (i.e. let in too much light), we tend to blow out the highlights (where very bright parts of an image lose all detail and just become white blobs), and when we "underexpose" an image (i.e. don't let in enough light), the whole image becomes very dark, and we lose a lot of detail from the shadows.
DSLR users can use a combination of the camera's settings (mainly Shutter Speed, Aperture and ISO, among others), to manage how much light is allowed in and onto the sensor, but mobile phone users (and those who use Auto mode on their DSLR!), often don't have this ability, and have to rely instead on the clever camera's features to get the balance right automatically. It is important to note though, that some modern phone cameras do let you have some control over light with an Exposure adjustment button, and if you have one of these, it's it's a good idea to grips with how to use it, as it can make a difference to the images you capture.
Even shooting automatically (like I assume many of you do!), there are still some things you can do to better manage light, and help your phone camera find the correct exposure. These are explained a little, below. There's also a few tips in there for finding beautiful light, and how using it creatively can elevate your images into something special.
2. tips for Managing light
FIND "SOFT" LIGHT!
Soft light occurs when it's diffused. As the sun is our main source of light, we need to find times where sunlight is diffused. Sunlight is naturally diffused by the atmosphere when it's low in the sky - in the morning or late afternoon - shooting at these times gives a beautiful soft golden light that is perfect for pictures. Overcast days with lots of cloud cover are also ideal for photographs as the cloud diffuses the light evenly, and there are often no very bright streams of sunlight hitting the camera!

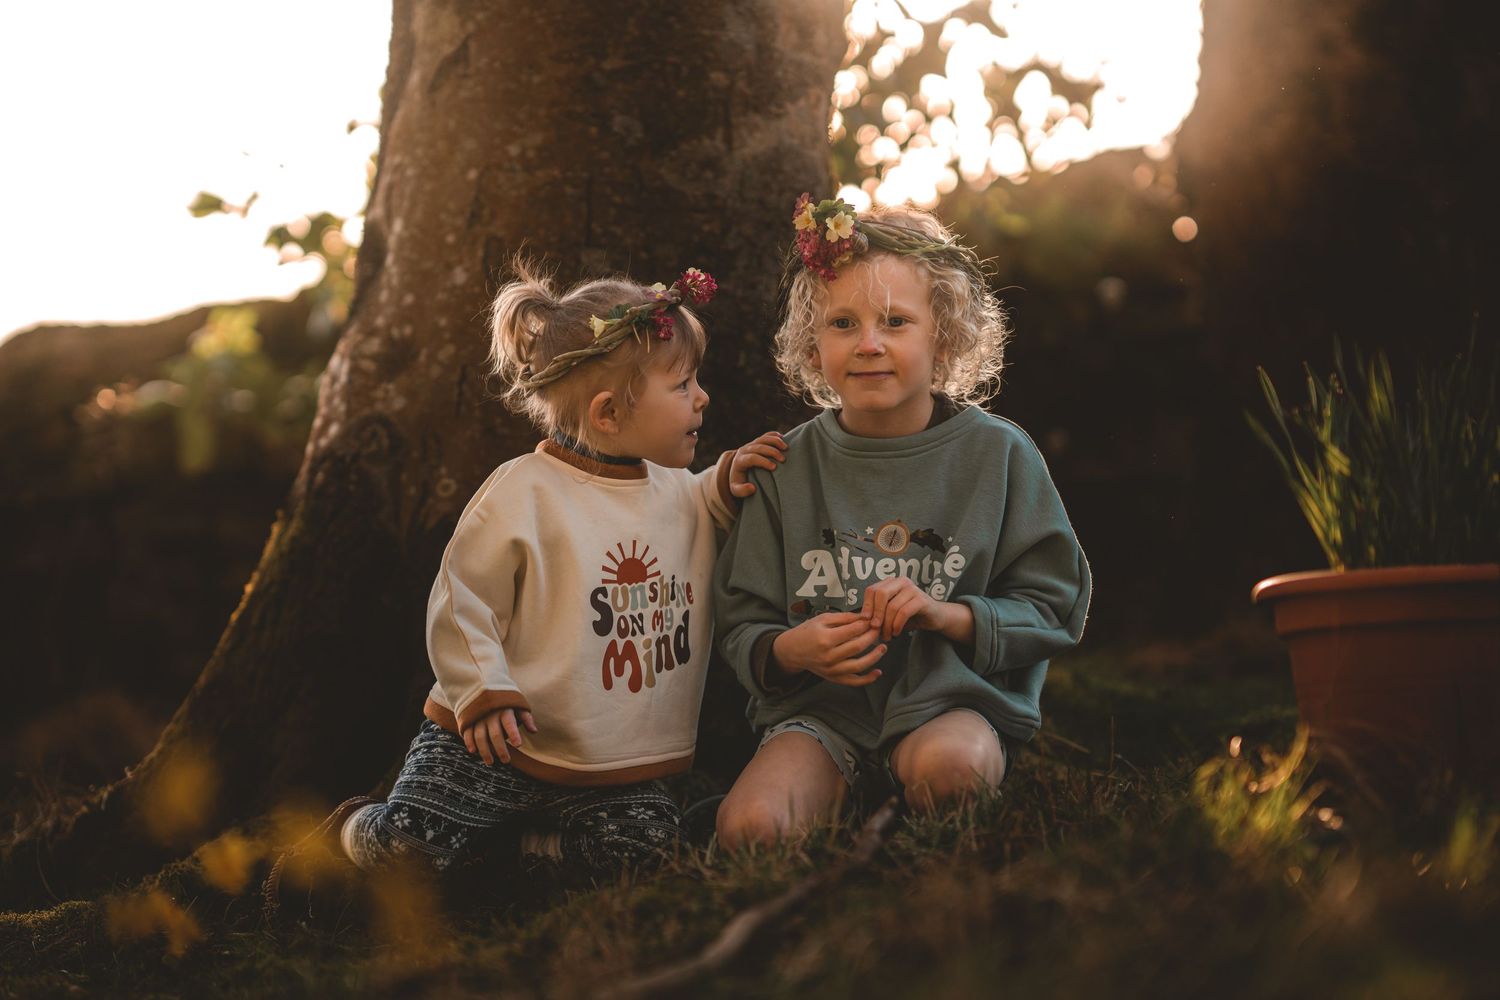
Late afternoon light is ideal for warm woodland portraits. It is helped here by being diffused further by the trees behind Arthur.
Early evening, when the sun is low in sky creates lovely warm light, but can be an issue for balancing exposure.

Overcast days provide lovely even lighting and are the easiest way to get great looking photographs.
AVOID HARSH LIGHT!
Midday sunlight is harsh, strong and bright, and often angled directly downwards. Whilst this may seem beneficial, in reality, this creates horrid shadows, eye bags and a lot of contrast (very dark and very bright areas in a photograph). Not only that, but these very bright and very dark areas make the camera struggle to expose properly for the scene, which usually results in blown highlights (where very bright parts of the image lose all detail and become just white blobs that can't be fixed!). Where possible, we should avoid this time for photos, or, where we can't do that, use natural structural diffusers to soften the light, such as trees and leaf canopies in woodland areas (also see Light Pockets, below). I'd also recommend not shoot directly into the sun (even during diffused times) or be tempted to use your in-built flash to provide additional light, as it is often harsh, direct, and not very conducive to beautiful images!

The harsh Moroccan sun would have blown the highlights of this image if we didn't use an archway of a building to diffuse the light.

The trees in the forest naturally diffused and dampened the harsh midday sunlight in this image, creating a softer light. This is also a "light pocket".
Don't Be AFRAID OF THE DARK!
I tend to slightly under-expose my images to avoid blown highlights and really bring out the light. I also darken my images when editing to get a sense of where the light is coming from and emphasise it where I can. I use a DSLR Camera (and editing software), but you can also do this on your phone camera too, by lowering the exposure, shadows and blacks, and increasing highlights, whites or contrast in the "edit photo" function of your phone. This will darken the image overall, but make the lighter areas of your image "pop".


3. Tips for Beautiful Light
USE DIRECTIONAL LIGHT!
Looking at the direction of where the your light is coming from can create some wonderful images. I try to use sideways light in my images so subjects have a side-lit profile (i.e. half lit and half shadowed). This creates depth in an image. Positioning light behind a subject (called backlight), creates drama, ambience and wonderful light halos, particularly around messy hair, but can also create silhouetted subjects where detail can be lost. The best way to learn how to handle backlight is through experimentation! It's important to remember that light is naturally angled sideways when the sun is low in the sky, so this effect is often easily achieved when shooting in the morning or late afternoon / early evening. You can also use objects to direct light where you want it to go and these are best described as "pockets of light" (see 4., below).

Natural side-lighting in this image has created three dimensional depth that makes Sybbie pop amidst the dark grasses behind her.

Backlighting in this image of Sybbie in the wild leek has created a lovely hair halo, but highlighted her little features in profile, too.

Directional light has illuminated just one-side of Arthur's face, creating contrast and depth in the image.
FIND "POCKETS" OR "WINDOWS" OF LIGHT!
Objects, like trees, fences, tree canopies, or even actual windows indoors, will block or allow light to pass through. Taking advantage of these light pockets can allow you to gain a little more control of where the light is landing or coming from and can create beautiful scenes. Photographers that use portable flashguns (a remote controlled flash on a stick) to light their images use similar techniques to this, but they have more control as they can position a flash to provide light exactly where they need it. Most parent photographers will have to make do with finding natural light pockets - it's a bit more difficult, but still works!
Another practical tip - if you're shooting indoors using natural window light, turn off all the lights in the room that you're in so the main source of light is the natural one coming from the window. Artificial light has a more yellow/orange hue than natural light (which is more blue). If you shoot using both types of light, your camera will become confused and produce images that have a mixture of contrasting hues that is quite unattractive!

The thick, wooden bridge railing creates a pocket of light, allowing me to light just Sybbie's face.

The trees have created a natural pocket of beautiful light that illuminated Sybbie from behind.

The window is allowing natural light in to illuminate Sybbie while she pours. Her bonnet is also acting as a second filter for the light.
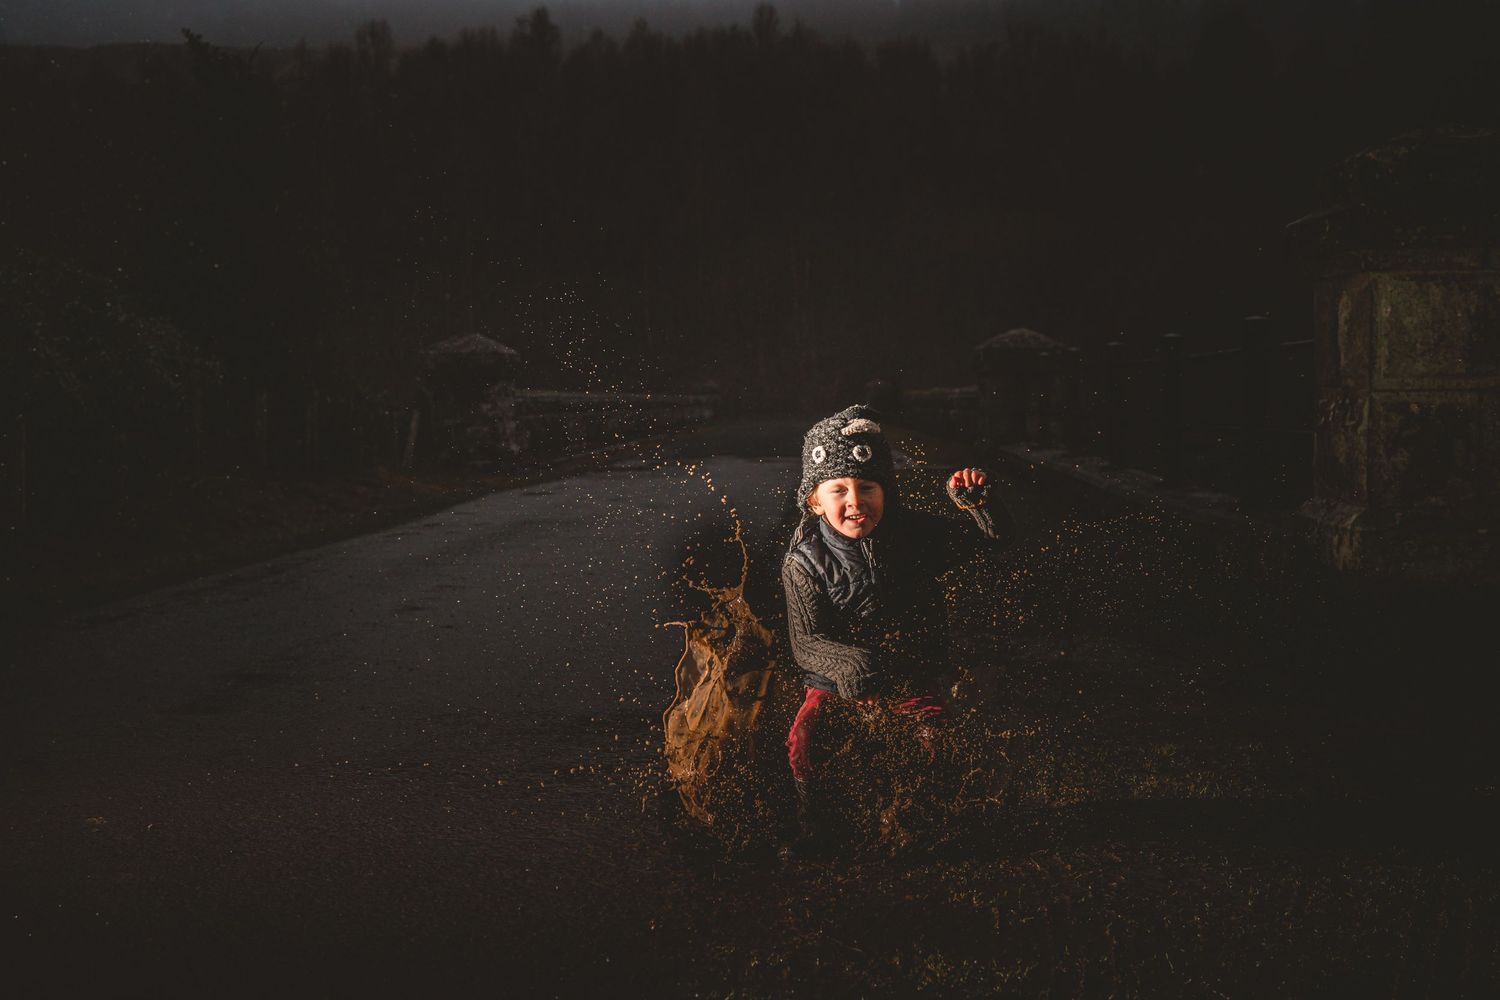
This image of Arthur puddle jumping was captured on a nighttime walk using a portable flashgun on a stick. It uses the same lighting principles, but I had complete control of the direction and intensity of the light.
That's all for now - I can waffle-on about photography all day, but I certainly don't want to bore you. If any of you have any queries or comments, feel free to email or DM me on social media @thegrizzlyforager! I'd also love for you to post a few of your pics if you've put these tips into practice!
Happy Snapping!